Wednesday, June 3, 2009

Meringue Buttercream Cupcakes, aka heart attack on plate


This recipe is one of the more complicated I have tried, the cupcake is easy, but the meringue is kinda nuts. You really do have to follow the instructions closely or it will be another EPIC COOK FAIL. But honestly, these things are freaking amazing and everyone that tries one will be permanently indebted to you. This is not the best cupcake for a cookout, unless it’s kept indoors. Serve at room temperature, but store in the fridge before an event.


Cupcakes:
1 cup unsalted butter
2 cups sugar
1 1/4 teaspoons vanilla extract
4 eggs
3 cups sifted cake flour
1 tablespoon baking powder
1/2 teaspoon salt
1 cup milk
Regular or silver cupcake paper liners

Preheat the oven to 350 degrees F.

Before starting sift together the dry ingredients in a smaller bowl.

In a larger bowl, cream the butter until light and fluffy with a mixer on a higher speed. Add the sugar and continue to cream. Gradually add the vanilla and eggs and mix in well. Add the dry ingredient mix into the butter mixture alternating with the milk. Pour batter into cupcake paper-lined muffin tins filling them 3/4 full. (careful though, all that baking powder makes them rise abnormally fast) Bake until puffed and firm in the center and light golden brown on top, about 20 to 25 minutes. Let cool.


Meringue:
5 eggs whites (large)
1 1/4 cup extra-fine granulated sugar
1/4 water
3 sticks unsalted butter, soft

Directions

Set out the ingredients and equipment.

Separate the egg whites and place them in the bowl

Measure 1 cup of sugar with 1⁄4 cup water into a heavy bottom 1-2 quart pot. Gently stir to combine.

Measure 1⁄4 cup sugar into a small bowl and set aside. (this is for the egg mixture)

Cut the butter into tablespoon size pieces and set aside

Begin heating the sugar syrup. Place the pot with the sugar and water over medium-high heat. Keep lid on it, keeps the moisture inside and prevents the sugar from separating.

Begin whipping the egg whites to stiff peak in a standing mixer fitted with the wire whip attachment on high speed. When the meringue is stiff peak, keep the mixer running and pour the 1⁄4 cup of sugar into the meringue.

Test the temperature of the sugar syrup with a candy thermometer. Raise the heat to bring the syrup to 245°F if it is not there already. When the syrup is at 245°F remove from heat and slowly pour the syrup into the meringue. (This is serious stuff people. It’s best to have standing mixer, but I sure as hell don’t so make sure you have a strong arm to pour it every so slowly. If you think it doesn’t matter, you’ll have solid sugar adhered to the bottom of your bowl and you will have to start again)

When pouring, keep your eye on the bowl. Aim for the space between the mixer bowl and the revolving wire whip. And keep an even flow.

After 1-2 minutes reduce the speed to medium for about 3-4 minutes or until the meringue is cooled.

Add the butter one tablespoon at a time. Hike the speed up now to fully incorporate the butter.

To ‘ice’ the cupcakes, it’s much easier to put it in a decorating tube and just kinda swirl it up on top. But don’t handle it too much, remember how much butter is in there. I topped mine off with a few dark chocolate chips.

If basic vanilla is too…well, basic…try these additives:
1-2 tsp vanilla extract or the seeds of 1 vanilla bean
1⁄4 cup of raspberry puree
1⁄2 cup of melted, cooled chocolate
2-4 tablespoons of amaretto depending on your preference

Sunday, May 10, 2009

Brownies to make anyone jealous

Caramel and Chocolate brownies with marshmallows and M&M's on top.

I have people begging me for these things week after week at work. The key is to only bring them in at random, keep them guessing...and salivating.

You can do this one of two ways...be cheap and lazy and just get a box of brownie mix (plus you'll need the items listed in blue)...or...be a Betty Crocker and make them from scratch. If you opt to do the box mix, follow the instructions on the box and then move down the page until you see a bright blue STOP.

For homemade brownies begin here:

Ingredients:
  • 4 squares Unsweetened Baking Chocolate
  • 3/4 cup butter or margarine
  • 2 cups sugar
  • 4 eggs
  • 1 cup flour
  • 30 Caramels
  • 2 tablespoons milk
  • 1 (12 ounce) package Semi-Sweet Chocolate Chunks
  • bag of mini M&M's
  • bag of the smaller jet-puffed marshmallows
Directions:
  1. Preheat oven to 350 degrees F. Line a 13x9-inch glass baking pan with foil, with ends of foil extending over sides of pan. Grease foil.
  2. Place chocolate squares and butter in large microwaveable bowl. Microwave on HIGH 2 minutes or until butter is melted. Stir until it until the chocolate is completely melted. Add sugar; mix well. Blend in eggs. Add flour; mix well. Spread mix into dish.
  3. Bake 20 minutes. At the 20 min mark pull out of oven and sprinkle marshmallows over the top. Place back into oven for 10 minutes. Once the 10 minutes passes make sure the brownies are done by testing with a toothpick. DO NOT OVERBAKE. If done, sprinkle with M&M's
  4. Meanwhile, place caramels and milk in microwaveable bowl. Microwave on HIGH 2-1/2 minutes, stirring after 1 minute. Stir until caramels are completely melted and mixture is well blended. Gently spread over brownie in pan; sprinkle with chocolate chunks. Cool in pan on wire rack. Lift brownies from pan, using foil handles. Cut into 36 squares. Store in tightly covered container at room temperature.
STOP HERE IF YOU ARE THE LAZY ONES:
  1. At the 20 min mark pull out of oven and sprinkle marshmallows over the top. Place back into oven for 10 minutes. Once the 10 minutes passes make sure the brownies are done by testing with a toothpick. DO NOT OVERBAKE. If done, sprinkle with M&M's
  2. Meanwhile, place caramels and milk in microwaveable bowl. Microwave on HIGH 2-1/2 minutes, stirring after 1 minute. Stir until caramels are completely melted and mixture is well blended. Gently spread over brownie in pan; sprinkle with chocolate chunks. Cool in pan on wire rack. Lift brownies from pan, using foil handles. Cut into 36 squares. Store in tightly covered container at room temperature.

Wednesday, April 29, 2009

You say..

If you are wondering where I have been or why I have not been posting, there has been too much of this going on:

I say: How can I help you?

You say: Yeah, I need these 11x17's printed out and bound.

I say: Any special paper?

You say: Insides are regular and the cover is gloss.

I say: Is the cover Glossy Card stock or glossy text like a magazine?

You say: Glossy.

I say: Glossy cardstock or glossy text?

You say: Glossy cardstock.

I say: Any special instructions? Covers? Coil binding.

You say: No, just print and bind.

(walks over to color machine, out comes pretty 11x17 book. Phone rings. Bind book as I am answering call about oversize color. Deliver book to counter)

I say: Alright, here ya go. Anything else today?

You say: This is wrong.

HUH??????

I say: Ok, what is wrong?

You say: I need the 11x17's folded, the cover cut and the actual finished size at 8.5x11.

JIGGA HUH?????

What I wanted to say: So dumbass, when I ask for simple instructions and you watch me do the entire thing wrong you and wait until I give it to you at the counter to spill on actual instructions?

I say: Ok, no problem

You say: (sigh) Fine.

(print out second copy and practically toss it on the counter and tell him he needs to fold it and then we'll bind it)

I say: Here you go, is that all you needed?

You say: I wanted the insides on glossy paper too. This doesn't look right!

I say: Ok, hold up. At the beginning of the order you did not specify this, when I do the second time you never mentioned this. So I am gonna ask again, what kind of paper and what kind of bind?

You say: Regular paper, 11x17, folded with a VELO bind.

I say: Glossy paper or regular?????

You say: regular!!!

I say: You have regular in front of you.

You say: No I want glossy.

(I laugh, and breathe, and shoot him the dirtiest look I can give. reprint, re-bind and throw it on the counter)

I say: Are we good?

You say: I guess I will just have to take it this way....

I say: Yep. $45.67

You say: WHAT?

I say: $45.67.

You say: Do I get a discount for waiting this long?

AAAAAAAAAAAAAAAAAAAAHHHHHHHHHHHHHHHHHHHHHHHHHHHHHH!!!!

Sunday, April 5, 2009

Chili-Lime Salmon...HOLLA

This was a quick and easy recipe for salmon. (it seems that I am wearing out the goat cheese so I had to spice it up) You can grill or bake or sear the salmon...I baked since the boy toy was too 'tired' to fire up the grill.

You'll need:
  • 4 salmon fillets, about 6 ounces each
  • 3 teaspoons fresh lime juice
  • 2 cloves garlic, minced
  • 1/2 teaspoon sugar
  • 1/4 teaspoon chili powder
  • 1/4 teaspoon cumin
  • 1/8 teaspoon salt
  • 1/8 teaspoon black pepper
  • 4-6 lime wedges
  • 3 tablespoons of olive oil (don't you dare call it EVOO)
  • 2 tablespoons of butter
If you are using your oven:
Preheat to 425
Combine lime juice, garlic, sugar, chili powder, cumin, salt, pepper and olive oil in a small bowl. Mix and let it sit while you inspect your salmon. Make sure none of those tiny bastard bones are left in it and tweeze any if they are left in there. In a glass baking dish cut up your butter into small squares and toss them in the dish, place salmon fillets in dish and then evenly distribute the saucey-sauce on top. Let it sit for 7-10 minutes.

Fire up a skillet and place the fish in for about a minute per side and place back in the baking dish and cook for about 5-7 minutes. Salmon should flake easily.

Using your grill:
Preheat grill for medium heat. Use the mixture instructions above that are italicized. Spread mixture evenly over fillets. Place skin side down onto grill and cook for about 18 minutes, or until fish flakes easily. Remember not to turn the salmon when it is one the grill.

Once cooked sprinkle lime juice over the top and serve with a couple of slices of lime on top.

Cake Pops

I totally went with the latest and greatest confectionery craze by making spring/easter related cake pops. They tasted great, but I wasn't really into putting too much effort in the decorating department. Check out Bakerella's blog for the real deal, and here is where you learn to make them.


Thursday, March 26, 2009

Skillet Steak, Garlic, Lemon and Feta oh MY.

I am not usually a red meat kinda girl but sometimes I just have to have it. (no comments please) I bought some skillet steaks and wanted to do more than just cook them so I made a marinade and a sauce to work some flavorful magic....

4 skillet steaks

Marinade:

1 cup white wine
1/2 cup olive oil
1 teaspoon thyme
1/8 teaspoon paprika
1 tablespoon dried parsley
1/2 teaspoon of garlic
1 tbsp of chopped shallots

In a bowl mix all these ingredients together and let soak for about 10 minutes. When ready pour them into a large plastic ziploc bag and add your steaks and seal. Leave in the fridge for about 15 minutes. (oh and the steaks should be thawed)

This next part needs:

1 lemon, sliced thin
3 to 4 cloves of garlic finely chopped
3 tbsp of olive oil
salt and pepper to taste
1/2 cup feta cheese

In a medium skillet warm olive oil over medium high heat. Add salt and pepper to taste, place steaks in the skillet cooking about 3 minutes per side for a medium well steak, less for more red color. Remove the steaks and store on a warm plate. Add lemon and garlic and the leftover sauce from the bag to the skillet. Boil this liquid mixture, stirring frequently for about 4-5 minutes. Remove from heat and drizzle over steaks. Add feta cheese to the tops of the steak....

I'd recommend serving some garlic mashed potatoes and a green salad on the side.

Tuesday, March 24, 2009

Georgah! Peach Pie.

If you live in Georgia you should probably know how to make a decent peach pie...I mean every other street has the word 'peach' in it...Peachtree, Peachford, Peachling, PEACH! So that is why I decided to conquer this pie. It turned out pretty darn good.

Ingredients:
  • 2 nine inch pie crusts (you can be a cheater and buy the pre-made stuff if you must)
  • 1 egg, beaten well
  • 5 cups sliced peeled peaches (I used about 6 1/2 nice sized peaches)
  • 3 tablespoons lemon juice
  • 1/2 cup all-purpose flour
  • 1 cup white sugar
  • 1/2 teaspoon ground cinnamon
  • 1/4 teaspoon ground nutmeg
  • 1/4 teaspoon salt
  • 4 tablespoons butter
Directions:
Pre-heat your over to 450 degrees.

Lay one of the pie crusts in a pie dish. Brush with some of the beaten egg to keep the dough from becoming soggy and gross later.

Slice and peel your peaches. Try to keep them mostly the same size so they cook even. But don't be a dork and measure them to the exact size.

Place the sliced peaches in a large bowl, and sprinkle with lemon juice. Mix gently.

In a separate bowl, mix together the flour, sugar, cinnamon, nutmeg and salt. Pour over the peaches, and mix gently. Try to use all the flour and sugar mixture. Sprinkle the left over into the pie dish and over the peaches.
Pour into the pie crust, and drop cubes of butter over the top of the pie. Cover with the other pie crust, and fold the edges under. Flute the edges (you know push 'em together and seal with a fork) to seal with a fork dipped in egg. Brush the remaining egg over the top crust. Cut several slits in the top crust to vent steam.
Bake for 10 minutes in the preheated oven, then reduce the heat to 350 degrees F and bake for an additional 30 to 35 minutes, until the crust is brown and the juice begins to bubble through the vents. If the edges brown too fast, cover them with strips of aluminum foil about halfway through baking but be sure not to burn yourself...it's HOT. Cool before serving.

Tuesday, March 17, 2009

Cupcakes as Motivation

In my personal hell workplace we don't celebrate anything, mostly because we are either too busy or too lazy to actually put anything together. We NEVER eat any type of meal so we often snack on Swedish Fish and Milk Duds. So I decided to be coercive sweet and make something for St. Patty's day. I made my cupcakes, frosting and fondant from scratch...yes I have lost my ever loving mind!!! But hey, they are pretty! (make the fondant a day or so prior to your cupcake adventure)

Cupcake Recipe:
  • 3 cups cake flour sifted
  • 2 1/2 teaspoons baking powder
  • 1/2 teaspoon salt
  • 1 3/4 cups granulated sugar
  • 2/3 cup butter or margarine
  • 2 eggs
  • 1 1/4 cups milk
  • 1 1/2 teaspoons pure vanilla extract
Directions:

Preheat oven to 350°F. Throw some decorative cupcake liners in a cupcake pan and feel proud they aren't the boring pastels from the local grocery store. Sift together flour, baking powder and salt; set aside. In a large-ish bowl cream sugar and butter together until light. (cream means to USE the hand mixer) Add eggs and vanilla to creamed mixture and beat until thoroughly mixed. Add flour mixture to creamed mixture alternately with milk, beating well after each addition. Continue beating one minute, you'll notice the color changing to a lighter color and getting more 'airy'. Pour into your pretty and creative cups. Bake 20-25 minutes or until toothpick inserted comes out clean. Cool 10 minutes in pan on rack; remove and cool completely before decorating.


Chocolate Frosting:

  • 2 3/4 cups confectioners' sugar
  • 6 tablespoons unsweetened cocoa powder
  • 6 tablespoons butter, softened
  • 5 tablespoons evaporated milk (regular milk will work too, don't freak out)
  • 1 teaspoon vanilla extract
Directions:
  1. In a medium bowl, sift together the confectioners' sugar and cocoa, and set aside. Sifting is imperative, It gets out the annoying clumps that will come back to haunt you in your cupcake nightmares.
  2. In a large bowl, cream butter until smooth, then gradually beat in sugar mixture alternately with evaporated milk. (do the sugar mixture slowly, or you'll end up inhaling waaaay too much into your lungs) Blend in vanilla. Beat until light and fluffy. If necessary, adjust consistency with more milk or sugar.

Fondant:

Let's talk fondant for a moment. I'd suggest for your first time you but the stuff already made at your local Michael's, Joanns Fabrics or whatever so you know what it's supposed to feel like or this will be frustrating.

Recipe:
  • 2 pounds confectioner's sugar, sifted
  • 1/4 cup cold water
  • 1 tablespoon unflavored gelatin
  • 1/2 cup glucose (found in cake decorating stores) or white corn syrup
  • 1 1/2 tablespoons glycerine (found in cake decorating stores)
  • 1 teaspoon desired flavoring (vanilla will give the fondant an off-white color)
  • Cornstarch
Instructions:

In a large bowl (do not use metal), sift the sugar and make a dainty well in the center. In a small saucepan, add the water and sprinkle the gelatin on top to soften for about 5 minutes. Begin to heat the gelatin and stir until the gelatin is dissolved and clear. Do not boil. Turn off the heat (you heatmeiser) and add the glucose and glycerine, stirring until well blended. Add the flavoring. Pour into the well of sugar, and mix until all of the sugar is blended. Use hands to knead icing until it becomes stiff. Add small amounts of confectioner's sugar if the ball-o-dough is sticky.

Form the mixture into a ball and wrap tightly in plastic wrap. Place in an airtight container. This icing works best if allowed to rest at room temperature for about eight hours before using, particularly if the weather is humid. Do not refrigerate.

You can color the fondant whatever your little heart desires, but I suggest purchasing the coloring that is gel like so you don't make the fondant any more sticky. If you are really adventurous I'd also get the fondant roller and mat, makes it more easy to handle.

FINAL STAGES:

I cut out circles with a glass and made my little decorations. Make sure the frosting on the cupcakes is fresh so the fondant has something to stick to and then have at it!!!

Chicken & Spinach Ravioli

I had some reservations about making my own ravioli, I mean noodles and stuff...really? But I was feeling adventurous last night and decided to go even more insane by making 30 bajillion raviolis. I recommend listening to me on this recipe since I lived my own version of Hell's Kitchen. (YOU DONKEY!)

For the pasta:
  • 4 eggs, beaten
  • 3/4 cup water
  • 3 3/4 cups sifted all-purpose flour
  • 1 1/2 teaspoons salt

For the filling:
  • 1/2 pound ground chicken
  • 3/4 cup chopped fresh spinach
  • 2 tablespoons finely chopped onion
  • 3 tablespoons melted butter
  • 3 tablespoons freshly grated Asiago cheese
  • 1/4 teaspoon salt
  • 1/4 teaspoon garlic powder
  • 1/8 teaspoon ground nutmeg
  • 1 pinch ground black pepper to taste
  • 1 (16 ounce) jar marinara sauce
  • 1/4 cup freshly grated Asiago cheese for topping

MAKE THE PASTA much earlier than you plan to eat, like a couple of hours before when you bored.
Pasta Making Instructions:
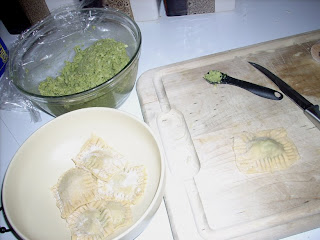
In a bowl, mix the eggs, water, 2 1/2 cups flour, and salt. Gradually mix in the remaining flour until smooth. Divide dough into 2 parts. Cover, and set aside in the refrigerator at the very least 20 minutes. Roll the pasta dough out on a well floured surface. I used a freakin' fondant roller and smaller hotdog shaped pieces of dough. Then I cut them into two inch squares and make sure that when you lay them out you do not pile them on like the picture above. They will stick. Also note that as the temperature of the dough rises the elasticity of the pasta will change, shrink etc. So keep them chilled between the pasta making and the filling making.

Filling Instructions:
  1. In a skillet over medium heat, cook the ground chicken until evenly brown; drain.
  2. In a food processor, mix the chicken, spinach, and onion. Transfer to a bowl, and mix with butter, 3 tablespoons Asiago cheese, salt, garlic powder, nutmeg, and pepper.
  3. Place about 1 teaspoon of the chicken mixture in the center of 1/2 the squares, and top with remaining squares. Seal the edges of the squares with a moistened fork to form the ravioli.
Cooking Instructions:
  1. Bring a large pot of lightly salted water to a boil, and cook the ravioli in small batches for about 8 minutes, or until al dente. Drain, and rinse under cold water.
  2. Place the marinara sauce in a saucepan, and cook until heated through. Serve ravioli topped with marinara sauce and remaining Asiago cheese.


I'll be honest though, this is not a quick process and I bailed early on and made two large-ish portions, succumbed to my ADHD and decided that I didn't feel like making any more, so I cooked some chicken breasts in the Foreman Grill with olive oil and salt and pepper to serve with the pasta. It turned out well though. Maybe you'll have more patience than my 10 minute attention span! Toodles.

Friday, March 13, 2009

Blue Cheese and Sun Dried Tomato Burgers

Here in Atlanta we had a short spring/summer burst and it got my summer flavors all in a tizzy, so I made some burgers in preparation for grill season. Well, there was a secondary reason, I attempted to make something that my boy toy could actually participate in, however his ever lazy ass decided not to fire up the grill and we used the foreman instead...well I used the foreman and he cleaned it a day later. Anyway, glue cheese and sundried tomato burgers were quite a hit and I imagine they'd be perfect for some sort of summer-related cookout. They have much more flavor and they are fairly cheap to make in mass quantities. Enjoy...I did until boy-toy refused to clean up.

Ingredients: (this is for 8 larger burgers, cut it in half for 4-6)
  • 3 pounds uncooked lean ground beef
  • 1 cup diced sun-dried tomatoes
  • 4 ounces blue cheese
  • 1/2 cup minced fresh shallots
  • 1 tablespoon steak sauce
  • 1/4 teaspoon hot pepper sauce
  • 1/4 tablespoon Worcestershire sauce
  • 1 teaspoon ground black pepper
  • 1 1/2 teaspoons salt
  • 1 1/2 teaspoon dry mustard
  • 12 hamburger rolls
Directions:
Mix all the above crap together in a big bowl (except the rolls...duh), use your hands, don't be shy. Grab a handful of the meat stuff and form into a patty shape. Done the more involved part.

Preheat an outdoor grill for high heat. Or you can wuss out and use the Foreman grill. Cook to the desired "done-ness". For a more well done burger it's about 5 minutes per side.

Put on your roll, cus that's how we roll and use your favorite toppings. DONE.

Monday, March 2, 2009

Goat Cheese Stuffed Salmon with Mayo Sauce, Mushroom Risotto and Red Potatoes

A WHOLE freaking meal for you guys!!!!! This is probably one of the more expensive meals I've made so don't go out to Publix expecting some cheap bill, use only for wooing purposes. I am going to go in order of what I made each step so your cooking times don't get out of whack. Follow my lead so your fish isn't getting cold while you are trying to make potatoes.

The entire meal is fresh salmon stuffed with goat cheese and baked with a homemade mayo like sauce, homemade risotto (although you could probably get by with the boxed kind) and boiled red potatoes.

Start with the Mayo Sauce
Ingredients:
  • 2 egg yolks
  • 1 whole egg
  • 1 tablespoon lemon juice
  • 3 teaspoons of Dijon Flavored Mustard
  • 1/2 teaspoon of salt
  • big pinch of white pepper
  • up to 2 cups veggie oil
Directions:
Put the egg yolks, egg, lemon juice, mustard, salt, and white pepper in the work bowl of the food processor; process for 10 seconds or more, until creamy.

With the food processor running continuously, pour in the oil very slowly in driblets at first, to start the emulsion process. NOTE: Add 10 to 15% of the oil at this time. The first addition should be small and gradual. Wait about 30 second between additions.

When the sauce has definitely thickened, you may add the oil in a thin stream. Do not stop the machine at this point, but stop pouring every few seconds to be sure the oil is being absorbed. NOTE: Add about 50% of the oil at this time.

Then continue until the remaining 1 1/2 cups of oil are incorporated. NOTE: You may not need to use all the remaining oil at this time. Set aside Mayo sauce in covered bowl.


Mushroom Risotto


Ingredients:

  • 6 cups chicken broth, divided
  • 3 tablespoons olive oil, divided
  • 1 pound portobello mushrooms, thinly sliced
  • 1 pound white mushrooms, thinly sliced
  • 2 shallots, diced
  • 1 1/2 cups Arborio rice
  • 1/2 cup dry white wine
  • salt to taste
  • ground black pepper to taste
  • 3 tablespoons finely chopped chives
  • 4 tablespoons butter
  • 1/3 cup freshly grated Parmesan cheese
Directions:
  1. In a saucepan, warm the broth over low heat.
  2. Warm 2 tablespoons olive oil in a large saucepan over medium-high heat. Stir in the mushrooms, and cook until soft, about 3 minutes. Remove mushrooms and their liquid, and set aside.
  3. Add 1 tablespoon olive oil to skillet, and stir in the shallots. Cook 1 minute. Add rice, stirring to coat with oil, about 2 minutes. When the rice has taken on a pale, golden color, pour in wine, stirring constantly until the wine is fully absorbed. Add 1/2 cup broth to the rice, and stir until the broth is absorbed. Continue adding broth 1/2 cup at a time, stirring continuously, until the liquid is absorbed and the rice is al dente, about 15 to 20 minutes.
  4. Remove from heat, and stir in mushrooms with their liquid, butter, chives, and parmesan. Season with salt and pepper to taste.
Begin boiling the water for your red potatoes at this point in large pot.


Goat Cheese Salmon

Ingredients:
  • 4 salmon fillets
  • 1/2 cup goat cheese
  • 1/4 cup prepared Dijon mustard mayonnaise blend
  • salt and pepper to taste
Directions:
  1. Preheat oven to 350 degrees F. Lightly grease a large baking dish.
  2. Arrange the salmon fillets in the baking dish. Make small incisions in each fillet, and stuff with equal amounts of the goat cheese. Spread equal amounts prepared Dijon mustard mayonnaise blend over each fillet. Season with salt and pepper.
  3. Bake salmon 15 minutes in the preheated oven, or until easily flaked with a fork.


Boiled Red Potatoes


Ingredients:
  • 1 1/2 pounds baby red potatoes
  • Salt
  • 3 tablespoons unsalted butter
  • 1 small bunch dill, finely chopped
Directions:
Bring potatoes to a boil in well salted water. Cook until fork tender. Drain then return potatoes to the same pot you boiled them in. Toss with butter and dill. Season, to taste with salt.


TAAAAA DAAAAAAA!

Spinach, Mushroom and Goat Cheese goodness Omelette


My lovely sister sent me a recipe similar to this and I just made a few modifications. It's AWESOME.

Each makes one omelette

Ingredients:
3 large eggs
1/4 cup spinach leaves (wilted)
1/4 cup mushrooms (I used canned organic from Trader Joes)
1/4 cup fresh goat cheese
1/2 cup milk
1 1/2 teaspoons of cream of tartar
cooking spray
salt and pepper to taste

Directions:
Turn your oven broiler on. Break your eggs in a medium sized bowl and beat until consistent. Add milk and cream of tartar. Spray a frying pan even on bottom and sides with cooking spray and place on burner on medium heat. Let your pan get warm evenly and then pour your egg mixture into the pan. Cook until you see the egg has cooked on the bottom, you'll see air pockets bubbling to the surface. Take off heat and add your spinach, mushrooms and goat cheese on the top. Place in the broiler for about two minutes. Once cooked you see the top of the egg is not runny at all. Use a spatula to loosen the egg from the frying pan and let it slip onto a plate. Turn one side over giving the appearance of the omelette above. Add salt and pepper to taste.

Deviations:
-You can use frozen spinach instead of fresh, just make sure to defrost it in the microwave.
-For more cheese, use some sharp cheddar
-Cream of Tartar is not imperative, just gives the egg more fluff
-Milk is not imperative, adds more fluff and increases the solid matter
-I highly recommend not using butter to coat your frying pan, I tried once with butter and once with cooking spray and had much better luck getting the omelette out with the cooking spray

Monday, February 23, 2009

EPIC Cake


I made a 14 layer cake last night. What did you do?

This cake is VERY good and surprisingly easy to make, although time consuming.. So put on your "What's cooking good lookin'" apron and make a cake.

Ingredients:

Cake Batter:
  • 1/2 cup shortening
  • 1/2 cup butter
  • 2 cups white sugar
  • 6 eggs
  • 3 cups milk
  • 3 cups self-rising flour
  • 2 teaspoons vanilla extract
"Frosting"
  • 3 cups white sugar
  • 1 cup butter
  • 1/2 cup unsweetened cocoa powder
  • 1/4 cup water
  • 2 cups evaporated milk
Directions:
  1. Preheat oven to 350 degrees F. Grease and flour 4 or 5 - 8 inch round cake pans. It's really important that you don't half ass the greasing, you'll totally jack up your ability to have a pretty cake.
  2. In a VERY large bowl, cream together the shortening, 1/2 cup butter and 2 cups sugar until light and fluffy. (I tried just a regular mixing bowl and it overflowed) Add the eggs one at a time, beating well with each addition, then stir in the vanilla. Add the flour alternately with the 3 cups milk; beat well. Pour 3/4 cup of batter into each prepared pan, and spread evenly. It really seems like it's not enough in the pan, but trust me, it is. You will need to bake the layers in two or three batches.
  3. Bake for 6 to 9 minutes in the preheated oven, just until the layers are dried out. Do not brown.You'll notice the cake is spongy looking and the edges will begin to shrink in from the sides. They aren't going to come out looking like regular sheet cake.
  4. To make the frosting: *****VERY IMPORTANT YOU FOLLOW THIS TO A SCIENCE OR THE FROSTING WON'T SET**** In a large saucepan over medium heat, combine 3 cups sugar, 1 cup butter, cocoa, water and 2 cups evaporated milk. Bring the mixture to a rolling boil which means the entire top is boiling, cracking and moving liquid within the pot, stirring frequently, then boil for 2 minutes. Remove from heat and beat for two minutes with an electric mixer. Remove from heat and let cool for about 10minutes
  5. Stack cake layers with icing in between, letting the icing run down the sides of the cake. Smooth the sides and top with the remaining icing.

Friday, February 20, 2009

Homemade Mac & Cheese

I have to admit I am really picky when it comes to Mac and Cheese, so I am impressed that I actually liked this. I tweeked it and this is the result.

Ingredients:

1 box of elbow macaroni cooked according to the box
10 ozs of shredded sharp cheddar and whatever other cheese you fancy
5 ozs of cream
1 egg
3/4 teaspoon dry mustard
1 teaspoon chilli powder
1 teaspoon salt
4 tbsp butter
pepper to taste

Once the noodles are cooked drain and put back into the pot. Coat the noodles with the butter. Once the butter is completely melted whisk the egg and add to the pot. Stir completely. Stir in cream and cheese. Once the cheese is melted add mustard, salt, chili powder, and pepper. Stir completely again, unless you'd like to die by chili powder. Heat on low for about three minutes and serve. Straight up Cheese Gangsta!

Tuesday, February 17, 2009

Stuff-it Feta Chicken and pasta

Another recipe made from about three others, stirred to perfection. This dish is perfect for a weeknight meal, full of flavor and easy on the pockets.

You Need:
For the chicken:
  • 4 skinless, boneless chicken breast halves
  • 6 ounces tomato basil feta cheese, crumbled
  • 1/4 cup Italian-style dry bread crumbs, divided
  • olive oil for moisture
  • 2 tbsp butter or margarine
For the Sauce:
  • 1 can whole plum tomatoes
  • 1 small shallot
  • 3 cloves garlic
  • 1 tbsp oregano
One box of angel hair pasta

Instructions:

Preheat the oven to 350 degrees. Get out the meat. Make sure the chicken is ALL the way thawed or your chicken will dry out. Make sure not to use auto-defrost on the microwave either, it can cook the edges too much. Best to take the chicken out before going to work in the morning. Slice a long pocket on one side of each of your chicken breasts. Coat the inside and outside with olive oil. Stuff the pockets full of feta cheese and I recommend using the basil and tomato flavored kind. Use a 9x9x9 glass baking dish or equivalent and sprinkle the bottom with the italian bread crumbs....not too much, maybe like a 1/4 inch deep. Place your chicken on top of the bread crumbs and sprinkle remaining breadcrumbs over the top. For added moisture I places a slice of butter on the top of each chicken breast. Set aside for about 10 minutes.

The homemade pasta sauce:
Blend your can of whole plum tomatoes in the blender on puree until the color is a bit lighter. Place the tomato mixture in a saucepan on medium heat for 20 minutes. Once you get the sauce going, put the chicken in the oven to bake for 20-30 minutes. Mince up your garlic and shallot. Put about 2 tbsps of olive oil in a frying pan on medium high heat and cook the garlic and shallot mixture in the oil until brown. You are just browning the garlic and shallots to get rid of the pungent taste. Place the mixture in with the tomato sauce that is cooking for the remainder of the 20 minutes. Also add the oregano.

Once the sauce and the chicken is going and you feel like king of multi-tasking, boil your water for the pasta and cook according to the instructions on the box. Maybe now would be a good time to crack open a bottle of wine and revel in the fact that you are master of the kitchen.

Now that everything is cooked, place your pasta and sauce in the center of the plate. Make a little nest in the center for your chicken to rest. Place the chicken in the center of the pasta dish...it should be moist but the crust should be golden brown. Sprinkle some extra feta cheese over the top and have your spouse/child/friend/roommate praise you for such an awesome job that you have slaved over after such a long day of work. Yum.

Tuesday, February 3, 2009

Chocolate Covered Strawberries

For your love-ah. Or those annoying coworkers that you KNOW will kiss some Valentine's Day Ass with special cupcakes and crap. Perfect time for over-achieving.

What you'll need:

  • About 3/4 to a pound of strawberries
  • 20-26 oz back of semi-sweet chocolate morsels (I really wanted to use the word morsels)
  • 16 ozs of white chocolate chips or be daring....peanutbutter morsels!
  • 2-3 tbsps of butter
  • toothpicks
  • wax paper
Instructions:

Unless you are like an uber cook, you probably only have the standard pots and pans. So we'll do it the ghetto stylin' way. You need two pots, one larger and one smaller. Make sure the small one isn't too small so that it can hang out on the rim of the larger pot without falling in. Fill the larger pot enough to surround the smaller pots bottom and sides with water. Bring to a heafty boil. Place 2 tbsps of butter and and about a cup and a half of chocolate chips into the small pot. Melt but make sure to keep stirring.

Line a cookie sheet with wax paper. Place the toothpicks in the tops of the strawberries for easy dipping. Once the chocolate is runny and easy to imagine dipping stuff in, place each strawberry in the chocolate about 3/4 of the way to the top. Once adequately covered stick it on the cookie sheet to dry. Keep doing this until either you can't handle it anymore or you run out of strawberries. Place the sheet in the fridge to cool.

Clean up your small pot quickly. It's a pain to get solid chocolate off a cooled pot. Once clean, start the white chocolate. This time, only use about a tbsp of butter. White chocolate is thinner and easier to handle. Only use about 1 cup of the morsels though, you don't need as much. Once the white chocolate is melted remove your sheet from the fridge and get creative with your strawberries. You can drizzle them making pretty lines, or you can double dip them.

Ta-Daa (enjoy the craptastic cell phone picture)

Bella Cream Sauce Tortellini

I combined about 4 different recipes for this one and it turned out darn good.

What you need:
  • 1 1/2 cups of Baby Bella Mushrooms
  • 1 cup hot water
  • 3 Italian sausages if you require meat in your dish, but not necessary for flavor
  • 1 pound pre made 4 cheese tortellini (the kind you buy in the refrigerated section)
  • 2 tablespoons of olive oil
  • 1/4 cup shallots, chopped (shallots are much better for this than onions...trust me)
  • 3 cloves garlic, minced
  • 1 teaspoon dried oregano
  • 1/2 cup heavy cream
  • 1/4 cup grated Parmesan
  • 1 1/2 tablespoons chopped parsley leaves
  • 1 tbsp of cornstarch

Instructions

If you want meat, start here...if not move to the next paragraph. Get out those lovely Italian Sausages! Cut or peel of the nearly transparent casing and make little meatballs with the remaining meat. This may make you terribly uncomfortable...I didn't like handling those things. Put one tablespoon of olive oil in a frying pan and heat to medium high. Once the oil is hot, cook the sausage meatballs until you don't risk killing anyone with undercooked meat. Place them on paper towels and dab them dry to remove the excess oil. Keep them safe and warm in the microwave.

Another recommendation, cut up your shallots and garlic before heating the pan especially if you suck at mincing and dicing.

Soak the mushrooms in hot water for 15 minutes. It's good for them. I put mine on the stove on the lowest heat possible. Strain mushrooms saving the liquid and I am serious, you'll need it later. While the mushrooms are soaking, cook the tortellini. I tried to wait on this and screwed up my timing making it take a lot longer to cook everything. At least make sure that you boil the water during the mushroom soaking part.

While the tortellini is cooking, heat olive oil in a large skillet over medium-high heat. And hey, be careful...hot oil burns. Add shallots and garlic and cook 3 minutes, stirring with spoon so nothing burns. Add the oregano and cook for about a minute, until your kitchen smells like an oregano explosion. Add baby bella mushrooms and reserved mushroom leftover liquid and bring to a simmer, for about 5 minutes. Reduce heat to medium, add heavy cream and cornstarch (If you made the sausage, put them in the sauce now.) and simmer 2 minutes to heat through. Add tortellini to the mushrooms and cook 1 minute, to heat them up and roll 'em around in that tasty sauce. Remove from heat and stir in cheese and parsley. Serve quickly, no one likes a cold noodle.


For presentation, I placed the noodles and sauce on the center of the place and put the meatballs on the top. I then sprinkled some leftover Parm and added a sprig of something green to the side. Parsley is a good choice.

Total time: 26 minutes

Monday, February 2, 2009

Slacker Panini on Foreman Grill

I like Panera and Atlanta Bread a little too much and my wallet hates me for it. So I came up with a slacker version of the panini.

What you need:

Lunch Meat, I prefer turkey
1 tomato
Cheese, I prefer Gouda
Bread, I prefer organic sourdough but regular white sandwhich bread works too
Mayo or Hollandaise sauce
butter or margarine
Foreman Grill

Turn on the grill.

Put some margarine on one side of each bread.
Slice the tomato and put one slice on the bread.
Place a slice of gouda on the bread.
Put the amount of turkey you want on the bread.
Slather on some mayo or hollandaise sauce.
Put on the grill once it's warm.
Leave on until the light turns off.

Enjoy it's cheap and easy goodness.

Starbucks Yogurt Parfait

I got tired of paying $4.00 for a freaking yogurt parfait at Starbucks at least three times a week and began a mission to find ingredients that were exactly like the flavors Starbucks has and I scored. You are reaping the benefits of way to much yogurt sampling.

What you need:

(1) 32oz tub of Stonyfield Vanilla Yogurt, lowfat
(1) (12 oz) bag of granola, I recommend Triple Berry Crunch by Bare Naked
(2) cans of organic pie filling, I recommend Nature's Flavors strawberry and blueberry
5-6 Tupperware containers, In recommend Ziploc® Brand Twist 'n Loc® Fresh SHIELD™
Plastic Baggies

In a bowl mix together the strawberry and blueberry filling. Make sure to drain the blueberries unless you prefer a gigantic bowl of ugly liquid. I also don't put all the jelly like stuff with the strawberries. Just a little bit. Once the filling is mixed pour about 1/4 of the containers full of the mixture. Next pour yogurt over top of the fruit stuff a little over the halfway mark in the container. Seal and keep in your fridge. For later convenience put the granola in individual plastic bags next to your yogurt parfaits making less of an excuse of how Starbucks is just easier.

Yeilds: 5-6 servings, depending on how much you want in your container
Time it takes: About 5-10 minutes